


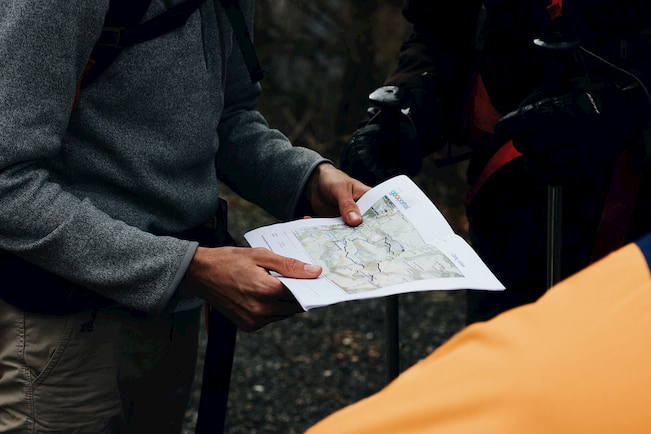
If you venture into the vast Australian wilderness, at one point or another, you’re going to need to read a topographic map (also known as topo map). Having a topo map for wilderness survival, adventure, navigation and research is an essential precautionary measure for your safety and comprehension of the landscape and terrain. While you can bring a GPS unit or a smartphone, a printed topographic map and compass are going to be far more reliable in remote areas.

Unlike conventional maps, these pieces provide you with a realistic view and information of the landscape. Their main feature is their contour lines, which show changes in elevation. Plus, they’re filled with information that describes the terrain, such as the creeks, rivers, power lines, trails, tree coverage, streets, etc. That being said, Australia topo maps provide a lot of valuable information that can make a world of difference in your experience. Reading them isn’t difficult at all – you just need to understand the symbols, colours and contour lines.
Reading Contour Lines
Contours are parallel, curved brown lines that present the elevation and shape of the land by connecting equally elevated points. When reading contour lines on Australia topo maps, you can easily visualise a 3D shape on a 2D surface. The space between the contour lines is known as the ‘contour interval’, which represents a set distance. If the interval is 50 metres, the vertical space between two lines is 50 metres. You can find the interval on the map legend. If the contour lines are close together on a map, it means that there’s a steep slope on the terrain. Conversely, when they’re far apart, it means the terrain is flatter.
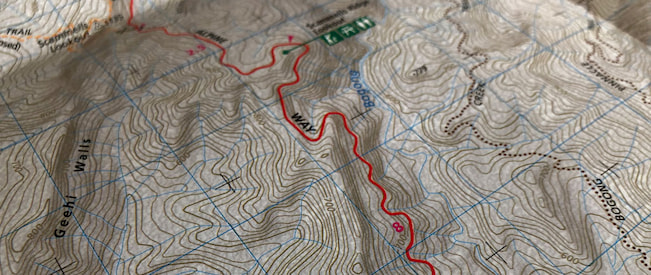
The darker-brown, thicker contour lines with an elevation number denoted are known as ‘index contours’. They are typically presented in increments of five. If a contour interval is 50 metres, the index contour interval will be 250 metres. Sometimes, cartographers will include shaded relief images with contour lines to accentuate the underlying topography.
Reading the Colours
Cartographers usually use the same intuitive styles and colours to graphically present what you’ll encounter in certain areas. Vegetated and tree-covered areas are green, shades of grey and black are used for human-made features, and water features are blue. Contour lines, as aforementioned, are typically depicted in brown.
Reading the Symbols
The purpose of symbols is to keep the map less crowded and legible. Common symbols include pick-axe (mines), tent (campgrounds), circles (towns, schools), stars or crosses (places of worship), and X (elevation markers). Most topographic maps are quite similar to one another, but there are a couple of factors you still need to consider before you buy a topographic map of Australia.
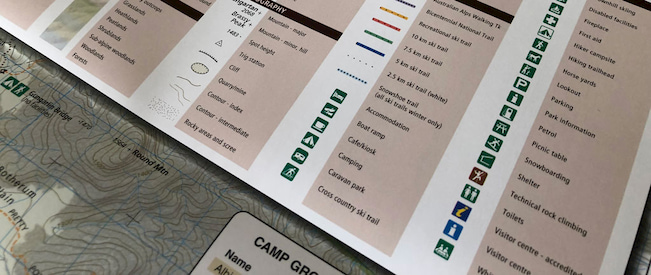
- Are the legend, scale bar, publication date and North arrow on the map? This is the most important, yet overlooked parts of buying a map. You don’t want to be in the middle of nowhere with an outdated model;
- Do you need a tear- and waterproof map? The answer to this question will depend on where you intend to travel. A paper print map from your office printer may be good enough for a one day hike;
- Is the map designed for 3 or 4 seasons? This is especially important when hiking areas with high snowfall, as you can check if the printed map lists all types of trails for various uses. For instance, a 3-season hiking route will differ from a skiing or snowmobile route in the same area;
- Is supplementary information about the area you’re transversing included? Look for wilderness or camping amenities or regulations and utility services. This information can be useful in case of an emergency or when planning your adventure.
Before you venture into the Australian outback
Before you venture into the Australian outback, you should become familiar with your topographic map. Practice folding it, and use creases to help better understand it. Locate the declination and North arrow. There’s a difference between Magnetic North and True North, so know what your map uses. If the map uses True North, there will be a declination annotation for Earth’s magnetic field. This is presented in a number, and it represents the degrees of adjustment you’ll need to make with your compass when using the map.
Next, take a look at the scale bar, which represents the ratio of map distances compared against actual distances between two points. For instance, an approximate scale of 1:20.000 means that 1cm on the map equals 0.20km in real life. Check the contour interval, as it can vary depending on the cartographer’s personal choice and the scale. Further, check the key or legend, as that’s where the symbols are defined. As aforementioned, the symbols can help identify features without congesting the map. Lastly, identify the route you’re going to travel and the key landmarks so that you can have a general idea of what’s ahead of you.
Safe travels!